
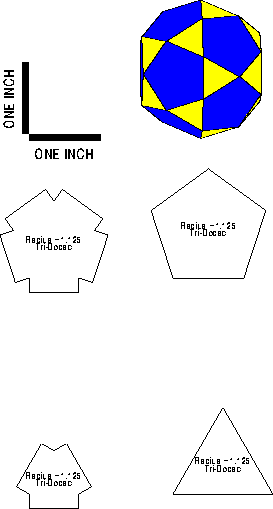
In triodec pattern seen here
http://www.footbag.org/footbags/pattern ... idodec.gif
Why are there two different sets of shapes is one truncated? should i use that? is there any reaaal benefit? thanks alot, i know its a lot of questions
ALSO when i print it out it doesnt seem to be at the right scale can someone give me the real legths??? THANKS SO MUCH
I need some help with a pattern!
I need some help with a pattern!
Vince Picone

here is a quote directly from the site about why there are 2 different shapes:
This is rather difficult to explain -- and even more difficult to justify. I am very particular about sewing.
As you will notice, each shape in the pattern is drawn twice, once with notches and once without. The templates without notches are actually oversized --- the corners of the _notches_ are actually the corners of the finished panels. Reason for the notches is to allow me to draw sewing guides on the material, and my seams are sewn from notch-corner to notch-corner.
First, cut out the patterns roughly and glue-stick them to a stiff piece of paper -- I use a file folder. Then cut the pieces more precisely along the printed lines. This gives you a fairly durable, accurate template for drawing on the Facile or whatever you are using to sew.
I use the following procedure for drawing the pattern on the material.
First, using the un-notched template, I draw as many copies as I will need.
Then, I carefully line up the notched template, and I draw in the notches on the previously drawn shapes.
Then, I cut out the pieces, but not the notches --- they are just used as guides for sewing.
To sew them together, I use medium-weight polyester thread. Some people say this may tend to tear facile, but I have never had a problem and it's much easier to deal with than the rope most bags are sewn with.
My sewing proceedure is to line up the the edges of two pieces and clamp them together with a tiny binder clip (those little black triangular clips with the flip-down handles). If you cut out your pieces carefully, the edges will line up correctly. If you are sewing a bag with different shaped pieces, the edges of the pieces won't be the same length and you have to center the smaller piece on the larger.
Using the binder clip makes it easier for me to sew straight from one dot to the other.
Note that the patterns are drawn such that there is a .2 inch flange of material outside the seam. Once I am done with all but the last one or two seams, I use a good pair of sewing sissors to cut off of the leftover 'flange' material about 2mm from the seam.
Well, that's about it.
This is rather difficult to explain -- and even more difficult to justify. I am very particular about sewing.
As you will notice, each shape in the pattern is drawn twice, once with notches and once without. The templates without notches are actually oversized --- the corners of the _notches_ are actually the corners of the finished panels. Reason for the notches is to allow me to draw sewing guides on the material, and my seams are sewn from notch-corner to notch-corner.
First, cut out the patterns roughly and glue-stick them to a stiff piece of paper -- I use a file folder. Then cut the pieces more precisely along the printed lines. This gives you a fairly durable, accurate template for drawing on the Facile or whatever you are using to sew.
I use the following procedure for drawing the pattern on the material.
First, using the un-notched template, I draw as many copies as I will need.
Then, I carefully line up the notched template, and I draw in the notches on the previously drawn shapes.
Then, I cut out the pieces, but not the notches --- they are just used as guides for sewing.
To sew them together, I use medium-weight polyester thread. Some people say this may tend to tear facile, but I have never had a problem and it's much easier to deal with than the rope most bags are sewn with.
My sewing proceedure is to line up the the edges of two pieces and clamp them together with a tiny binder clip (those little black triangular clips with the flip-down handles). If you cut out your pieces carefully, the edges will line up correctly. If you are sewing a bag with different shaped pieces, the edges of the pieces won't be the same length and you have to center the smaller piece on the larger.
Using the binder clip makes it easier for me to sew straight from one dot to the other.
Note that the patterns are drawn such that there is a .2 inch flange of material outside the seam. Once I am done with all but the last one or two seams, I use a good pair of sewing sissors to cut off of the leftover 'flange' material about 2mm from the seam.
Well, that's about it.
Last edited by Drew360 on 23 Apr 2006 11:30, edited 1 time in total.
DiceLiving...Let The Dice Decide
how long should i make each side then?? can you tell me the measurements i should plug into here?
http://patterns.phasing.org/
http://patterns.phasing.org/
Vince Picone
i haven't made that exact style of bag before.. but i can tell you when i used one of those patterns off of that site i printed out the templates so that the measuring "L" was about 3/4 of an inch on both sides... only use the normal templates not the ones with notches on them, throw those away don't even worry about them... i would do about 6-8 stitches on each side with a good amount of gather not to tight though... also sew your seam about 2mm from the edge, pretty close but with the gather you won't have to worry about the seam popping out... the ones i make come out the exact size of a golfball... i will post a picture of the size of it right now for you.... give me a minute...
Last edited by Drew360 on 23 Apr 2006 19:35, edited 1 time in total.
DiceLiving...Let The Dice Decide


no man dont try a machine, just keep tryin
Andrew's f00t(blog)
Last Updated: 5-22-06
Last Updated: 5-22-06
zilla wrote: It's like being a jedi and making your own lightsaber
I'm using a faux sued. It wasnt the material. I think the pattern was way too difficult for a first bag. One of the problems I was having is how do u decide how deep to make the stitch?? Do you mark it on all the pieces?
Anyway, do you have a pattern for a four panel small bag? I wanna make one about the size of a golf ball (or like in your picture) and I want it to be kinda like the Mr. Sand man. If there were a pattern I could cut out that would be fantastic.
P.S i found a pattern is 2.25 inches small enough? What are the diameter on yours?
Thanks,
Anyway, do you have a pattern for a four panel small bag? I wanna make one about the size of a golf ball (or like in your picture) and I want it to be kinda like the Mr. Sand man. If there were a pattern I could cut out that would be fantastic.
P.S i found a pattern is 2.25 inches small enough? What are the diameter on yours?
Thanks,
Vince Picone
here is my favorite 4 panel template.. with instructions on how to sew it:
http://www.valinet.com/~dbotkin/sew.html
here is another site about making 4 panels:
http://members.accesswave.ca/~derekn/footbagmain.htm
here is a Mr Sandbag template... if you just print it out as is, the bag i made with it came out alot smaller than a golfball... an easy way to resize it, is to just use this size template... then when tracing around the template onto the material, just use a marker or something that makes a thicker line... then cut the material from the outside of the thick line you drew.... it will make a bigger bag http://ben.unhq.com/hack/patern/mr-sand ... s2.JPG.jpg
http://www.valinet.com/~dbotkin/sew.html
here is another site about making 4 panels:
http://members.accesswave.ca/~derekn/footbagmain.htm
here is a Mr Sandbag template... if you just print it out as is, the bag i made with it came out alot smaller than a golfball... an easy way to resize it, is to just use this size template... then when tracing around the template onto the material, just use a marker or something that makes a thicker line... then cut the material from the outside of the thick line you drew.... it will make a bigger bag
http://ben.unhq.com/hack/patern/mr-sand ... s2.JPG.jpg
DiceLiving...Let The Dice Decide
if you are talking about the Dogsack pattern... just print it out out as is... it should come out under 2.25" but will work fine and come out around the size of a golfball if you do your gather right.Vpicone wrote: P.S i found a pattern is 2.25 inches small enough? What are the diameter on yours?
Thanks,
DiceLiving...Let The Dice Decide
ok i tried that pattern for the four that u like... But it came out more like a 3D rectangle.. eh.. Im gonna try a pattern i found for a 2.25 that looks kinda like an orange slice flattened out. Then maybe move onto yours. Thanks for the help w/ that gather stuff. Ill post a picture when Im done.
Vince Picone