Ask Waylon Lew anything about stitching and modding.

Discuss your gear and stitching and shoe modification in here.
User avatar
Wasabi
Amatera-Sewing
Posts: 4249
Joined: 26 Aug 2005 11:24
Location: Queens, NYC, NY, USA

Re: Stitching tips :

Post by Wasabi »

Hobit wrote:Have you ever created a new patern to experiment with ?
I like to think of new patterns whenever I'm in the stitching mindset. Like I mentioned above, colors become the inspiration, and how I should incorporate them into a variety of patterns soon become the inspiration, and hopefully, a realized product. I like to use rainbows, or all cool and warm colors, as a main theme in making great patterns. If I can put red, orange, yellow, green, blue, indigo, purple and pink into patterns, I definitely want that bag made.

But... have I created new patterns to experiment with? That is a bit difficult to say, because I have maybe one or two patterns to wow people soon, but other than I like to make existing patterns already known by most stitchers and put some variety into them.
Hobit wrote:You trace the panels that are going to get cut out . Whats your template ?
I honestly can't remember the dimensions to my template. It's been awhile. :oops: You'll have to experiment and see what works for you. A golfball is a great judge to see if you have the right type of sized bag you like to play with. However, I believe the dimensions I gave Jordan were just a bout right I think. I'm pretty sure I have two pentagon templates: one that is size 7.2 inches, and the other 8.
Hobit wrote:1mm is about an 1/8th inch ruffly correct ?
More like .0625 inch, or 1/16th inch (half of .125in), which is marginally close to 1mm I believe.
Hobit wrote:Is prewashing ultrasuede needed ?
I wouldn't say it's necessary, but Field's Fabric does suggest you do that before using it. I know most stitchers, including myself, don't this once we get our facile in the mail. However, if you wash your fabric well, it will come out more supple and slightly thinner than once you get it.

I know I have two pieces of Flash Red where one has been prewashed and the other hasn't. The one that was prewashed was from a bag of scraps I bought from Field's and it feels magnificent. Here's what Field's has to say on this issue, and I'm sure it works:
Field's Fabrics wrote:Fabric Care Tips

We recommend pre-washing all washable fabrics before sewing the garment. This helps eliminate shrinkage before you make the garment (one of the advantages of sewing). Always wash and dry cold or warm, not hot. Be sure to unfold the fabric before washing. When possible, hang/lay flat to dry (Hot dryers wear, shrink, and wrinkle fabrics). Re-inspect fabric after washing. Do not use bleach or detergent with bleach additive. Wash dark cottons and rayons separately, using a mild soap. Dark prints may require extra rinsing to remove excess dye.

All Ultrasuede® brand fabrics may be dry-cleaned (except for #001 White) or machine washed in warm water, tumble dry low. When using Ultrasuede fabrics for appliqué or color blocking, be sure to pre-wash it to prevent dark dyes from running onto lighter colors.
Hobit wrote:How long should a bag take to complete ? Im averaging around six hours.
I think it can take as long as you want! I'm a pretty slow stitcher, and I like to keep it that way. I honestly don't earn enough revenue in making bags to keep me alive, and part of me feels that my place in sewing footbags isn't profitable (at least in a self-employed business sense) because I take so long to make a 32-panel. However, if I put my mind to it, 5-6 hours is good for me.
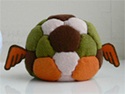
Hobit wrote:Just for fun id like to see you come up with a color patern for a Hot Fudge Sundae bag with a cherry on top . Heres an inspirational image below :

Image
I think that pattern is pretty killer, and would do wonders on a 32-panel star bag (meaning, the hexagons are actual hexagons and the pentagons are "stars" to accomodate the hexagons). However, it can also work with a regular 32-panel as well. Let me see if I can elaborate:

1 red pentagon (Flash Red highly recommended)
5 pentagons, 5 hexagons that are brown (Brownstone, Henna?)
6 pentagons, 15 hexagons that are white/pink/green - "vanilla/strawberry/mint" (Country Cream, Rapture Rose, Green Grape)
1 long thin spike to make the cherry stem.

All you do is sew five brown hexagons around the red pentagon, making sure that you put a spike anywhere that it touches the red pentagon, and then incorporate the 5 brown pentagons along with it. Make sure to keep the 3 white/pink/green hexagons for every two brown hexagons when sewing with the brown pentagons, and you will be good to go.

Hope this helps.
Waylon Lew - maker of Wasabi bags
NYFA represent.
"Footbag can be pretty frustrating when it's supposed to be fun. I was partly driven by this forum - practice, practice, practice... As that is true, I think someone can be too focused on progressing and training that they miss the fun aspect of it." - Bander87
LEGOMAN
Egyptian Footgod
Posts: 1171
Joined: 20 Dec 2006 21:00

Post by LEGOMAN »

why did you tell eric about our secret relationship
People that like LEGOMAN - 10
People that hate LEGOMAN - 1000
LEGOMAN´s posts - Priceless
User avatar
Wasabi
Amatera-Sewing
Posts: 4249
Joined: 26 Aug 2005 11:24
Location: Queens, NYC, NY, USA

Post by Wasabi »

LEGOMAN wrote:why did you tell eric about our secret relationship
Umm... three's a crowd? :wink:
Waylon Lew - maker of Wasabi bags
NYFA represent.
"Footbag can be pretty frustrating when it's supposed to be fun. I was partly driven by this forum - practice, practice, practice... As that is true, I think someone can be too focused on progressing and training that they miss the fun aspect of it." - Bander87
Hobit
Hack Fiend
Posts: 36
Joined: 10 Jun 2008 20:06

Re: Stitching tips :

Post by Hobit »

Yeah i like to play with color schemes as well . Im kinda more into matching tones and color coordination . But thats just my artistic feel of the matter .

But as for patern experimentation i was more curious as to wether or not you actualy have dabled in making a new footbag design .

Hehe , i didnt mean what size is your template . Sory bout that . I was trying to ask what is the template or stencil made of . I created a Diamond out of plastic for myself . Its somewheres around 3/4" wide by 2&3/8" long .

Image

I just got tired of measuring each one out on the fabric . I actualy purchase material from a company that develops special products out of plastics .
I was working on a schematic for a precise diamond i would like to have them fabricate cut for me .

I dont own a golfball i do know the bag should end being around 1.68" in diameter .

One Sixteenth . Ok thanks . Man that seems the seam is realy close .

Thanks for the info from Feilds . I think i would make the decision to
prewash from now on . Takes care of shrinkage and makes it softer were good selling points for me .

Oh good im not the only slow stitcher . I find it relaxing and entrancing sometimes to stitch . Just thinking and sewing you know ? Work is fast paced enough id hate to turn this into a race . It would be like rushing
a work of art . In my mind you dont rush art it just happens . I dont
know , it would be cool to think of the possibilities of selling bags for a living but that im afraid would take away from the enjoyment .

Thats a realy good perspective on the color scheme for the hot fudge sundae bag . Your neopolitan version is creative and perfect . Better than plain old vanilla . I supose using one of the animal prints could fill in as one of the icecream flavors . Like Giraffe could supplement as some sort of Chocalate Chip Ice Cream .

Id be forced to go with the soccer ball style to make that bag work . I already tried to break down a scheme that works for my diamond bags .

I look forward to seeing your new creations . Id like to see your take on the Sundae . Im working on some creative renditions for my daimonds
still . As soon as i get some time i will make the bags .

Take care Waylon .

hobit
User avatar
Wasabi
Amatera-Sewing
Posts: 4249
Joined: 26 Aug 2005 11:24
Location: Queens, NYC, NY, USA

Post by Wasabi »

I will be showing off two new footbag designs in the future, I guess. They're both unique in a way, but are pretty much variations when you think about it. One is a mix between the soccerball design and the rainbow spinner, in which I manipulate the hexagons to go around the 32-panel in one coordinated line (people who have asked me in the past why I number my panels would get a sense of how this pattern is done). The second is something that myself, Matt Cross and Jay Boychuck witnessed when we were at the "Jampionships" a couple of weeks ago at Pennsylvania when we were looking at a bag that Jay made, and I noticed that if you modified the bag a little, it would turn into a "ninja star" pattern. :D

Just expect them and be amazed! :wink:

Also, for making templates, I use fake credit cards that you would sometimes get from the mail, and I just cut out templates with them. They're actually sturdier than you might think, but I guess the difficulty is to cut out your dimensions accurately. Chris Miller taught me this method, and I guess it works out pretty well. Just cut your rough paper print out of your template(s) as accurately as possible, glue them onto the fake credit cards, and try to cut them out with a very sharp pair of scissors. Use a nail filer to smooth out any uneven or rough edges and you're good to go.
Waylon Lew - maker of Wasabi bags
NYFA represent.
"Footbag can be pretty frustrating when it's supposed to be fun. I was partly driven by this forum - practice, practice, practice... As that is true, I think someone can be too focused on progressing and training that they miss the fun aspect of it." - Bander87
Hobit
Hack Fiend
Posts: 36
Joined: 10 Jun 2008 20:06

New paterns :

Post by Hobit »

Those paterns sound rediculous . Im stoked to see what they look like .

Yeah credit cards would work but iwas looking for something thicker when
i made mine . My first template was made from a material similar to a credit card a little thinner but anyways . The template i have now i used a razor blade to cut it out of the plastic box i had lying around . When i got done i recognized there was a a sharp lip that was created on the under side of the template . This works out nice for when i press it down on the fabric it kinda locks into place and i dont have to wory about the fabric moving when i go to drag the marker across it .

You can actualy see the lip im talking about in the image above .

Laters on .

hobit
User avatar
kidzanshin
Shredaholic
Posts: 138
Joined: 20 Feb 2008 08:46
Location: Leicester, UK

Post by kidzanshin »

thought i'd throw a mod question into the mix to shake things up a bit

ive been playing on thin cheap insoles i put in my lavers for a while, and as some knee pain developed i felt some sports insoles would be necessary. i bought a good pair for high impact sports but when i put them in my lavers they became ridiculously tight

ive searched and people talk about removing the existing insole but they dont mention the insole being stuck or how to remove it if this is the part they are referring to

here is a couple of pictures of my lavers with the new insoles

Image

Image

is it the stuck down part with the repeated blue adidas logo that i remove before putting in my sports insoles and if so, how do i remove it?

cheers Waylon!!!
Matt Bailey

"never forget the cultivation of the mind and the body"

Flutterbags for sale and trade http://modified.in/footbag/viewtopic.php?t=19298 £10 / €14 / $21
User avatar
Wasabi
Amatera-Sewing
Posts: 4249
Joined: 26 Aug 2005 11:24
Location: Queens, NYC, NY, USA

Post by Wasabi »

Matt,

Yes, that is the stock insole that you want to remove from the Rod Laver shoe. You want to use a little bit of muscle, a knife and maybe a butter knife to help wedge that insole out of the shoe. The glue is particularly strong and the insole is really adhered into the shoe, but you can definitely take that out. That should make your sport insole fit much better into your shoe.

Also, if you are feeling a little daring, adventurous and want your Rod Lavers to feel better for footbag, you can mod the inside and toe material of your shoe. I see you haven't done that type of mod yet for your Rod Laver shoes, so I will explain the modding process below:

Notice that there are two different surfaces on both the toe and inside of the shoe - I call them the "mesh outer" and "fabric under." Whether it be the outer mesh or the fabric underneath you want to remove, I advise using a small swiss army knife, a nice pair of scissors (I utilize two pairs for comfortable modding; one for cuticles for opening cuts and a nice strong pair for the rest of the mod), and a butter knife to wedge the two sides away from each other.

For the inside, I start from the corner where you are in close proximity of the eyelets but also conforming your mod within the boundaries of the shoe's stitchwork. From there, carefully cut and make a small hole on either side you want to remove out and take care not to poke a hole through both layers. Once you have a sizeable hole, use your fingers or the butter knife separate the material and cut away as you go along the surface.

Obviously, the toe area is a little more difficult for removing the material underneath, but it is doable. Using the same method as I explained for the inside, take care to watch for any stitches that are connected to the tongue, and remove away. You'll have to judge by feel if you are making broad cuts with your large pair of scissors, and if you have a small yet sharp pair take care not to injure yourself. :wink: Just make small cuts and remove as much as possible.

Of course, if you are just removing the outer mesh, the modding process is ten times easier, and you'll be rewarded with grippier surfaces for footbag. The shoe will be stiff as usual, and won't be as breathable if you had modded out the fabric under, but a lot of players have modded the outer material out and swear by them to this day. But if you enjoy using mesh, I highly recommend you utilize the mod I explained above for best comfort for your shred.

Take care Matt, and good luck! :)
Waylon Lew - maker of Wasabi bags
NYFA represent.
"Footbag can be pretty frustrating when it's supposed to be fun. I was partly driven by this forum - practice, practice, practice... As that is true, I think someone can be too focused on progressing and training that they miss the fun aspect of it." - Bander87
User avatar
kidzanshin
Shredaholic
Posts: 138
Joined: 20 Feb 2008 08:46
Location: Leicester, UK

Post by kidzanshin »

awesome thanks waylon

as i bought them from worldfootbag.com the inside and toe materil mod and toe wall stitch mod had already been done to the soe, but insoles remained intact

thanks again
Matt Bailey

"never forget the cultivation of the mind and the body"

Flutterbags for sale and trade http://modified.in/footbag/viewtopic.php?t=19298 £10 / €14 / $21
User avatar
Wasabi
Amatera-Sewing
Posts: 4249
Joined: 26 Aug 2005 11:24
Location: Queens, NYC, NY, USA

Post by Wasabi »

I'm blind.
Waylon Lew - maker of Wasabi bags
NYFA represent.
"Footbag can be pretty frustrating when it's supposed to be fun. I was partly driven by this forum - practice, practice, practice... As that is true, I think someone can be too focused on progressing and training that they miss the fun aspect of it." - Bander87
User avatar
kidzanshin
Shredaholic
Posts: 138
Joined: 20 Feb 2008 08:46
Location: Leicester, UK

Post by kidzanshin »

haha!

well better too much information than not enough!
Matt Bailey

"never forget the cultivation of the mind and the body"

Flutterbags for sale and trade http://modified.in/footbag/viewtopic.php?t=19298 £10 / €14 / $21
bdams19
Atomsmashasaurus Dex
Posts: 787
Joined: 02 Jul 2007 20:31
Location: hoboken / nyc

Post by bdams19 »

the mod you put with the duct tape in my goonitz came undone! they are starting to get totally fuxed. i'm gonna see if my mom can fix them (she is a master seemstress) but otherwise can you give it another shot?
Brian Damato
My Blog
NYFA
User avatar
Wasabi
Amatera-Sewing
Posts: 4249
Joined: 26 Aug 2005 11:24
Location: Queens, NYC, NY, USA

Post by Wasabi »

That hole right in the middle of the mesh is hard for me to fix, to be honest. If it were a rip on the sides and/or corners of the surface, I can totally fix it, but other than that I would probably have to use black facile to replace the entire surface.
Waylon Lew - maker of Wasabi bags
NYFA represent.
"Footbag can be pretty frustrating when it's supposed to be fun. I was partly driven by this forum - practice, practice, practice... As that is true, I think someone can be too focused on progressing and training that they miss the fun aspect of it." - Bander87
User avatar
Drew
Fearless
Posts: 615
Joined: 25 Sep 2006 09:49
Location: Philadelphia, PA

Post by Drew »

Wasabi wrote: The amount of spikes necessary for filler gaps / bleedholes are 30 spikes.
The amount necessary for each pentagon, all around, is 60, because 12*5=60.
About what dimensions do you use for your spikes? I'm making my first spikey bag right now, figured I'd try it out, but just guessing as per spike length.
User avatar
Wasabi
Amatera-Sewing
Posts: 4249
Joined: 26 Aug 2005 11:24
Location: Queens, NYC, NY, USA

Post by Wasabi »

I think a good dimension is 3/4in - 1in. However, I'm a very rustic person when it comes to spikes (because I usually cut out spikes from unuseable scraps of facile that I store away), so my dimensions vary.
Waylon Lew - maker of Wasabi bags
NYFA represent.
"Footbag can be pretty frustrating when it's supposed to be fun. I was partly driven by this forum - practice, practice, practice... As that is true, I think someone can be too focused on progressing and training that they miss the fun aspect of it." - Bander87
HippieTom
Shredaholic
Posts: 174
Joined: 10 Apr 2008 11:42
Location: Bloomington, IN

Post by HippieTom »

im slightly confused as to how to sew a 12 panel or a 20 panel bag, where do you tie it off? the whole idea just kinda confuses me i guess
any help would be fantastic! :D
Tom Stouffer

CL: fairy, pixie, consistency, swirls, whirls, and bops(consistency)
User avatar
Wasabi
Amatera-Sewing
Posts: 4249
Joined: 26 Aug 2005 11:24
Location: Queens, NYC, NY, USA

Post by Wasabi »

I am not sure about tieing off in 20-panels, so you should probably ask/pm Louis Rinowski for more information on that type of footbag design. My closest guess is that it is a more elaborate version of the 8-panel, where the central focus of each corner of the triangle should have 4 other corners meeting each other, thus making 5 triangles forming a nice circle.

As for 12-panels, I can safely say that at the first pentagon where you sew in 5 more pentagons onto each of its sides forms the only "full circle" sewing path you will ever make in the footbag. Everything else is either sewing in 4 or less sides, and you just keep going around and around, making sure that when you sew panels around the pentagon there should be a situation where you should stitch i an adjacent pentagon that has already been sewn into the design. A good idea to form in your head is to imagine that each corner of the pentagon should have 2 other adjacent pentagon corners meeting each other at the very same spot. You just tie off when you are finished completing 5 sides of the pentagon.

Make sure to not add more panels so that your sewing path overlaps. I made this novice mistake once, so I really do stress that you keep an eye on a panel that has already been sewn in. You will have to finish your sewing path through some awkward bends very different from a conventional 32-panel design.
Waylon Lew - maker of Wasabi bags
NYFA represent.
"Footbag can be pretty frustrating when it's supposed to be fun. I was partly driven by this forum - practice, practice, practice... As that is true, I think someone can be too focused on progressing and training that they miss the fun aspect of it." - Bander87
User avatar
Wasabi
Amatera-Sewing
Posts: 4249
Joined: 26 Aug 2005 11:24
Location: Queens, NYC, NY, USA

Instructions on how to make a Pokebag!

Post by Wasabi »

I was asked on how to make a pokebag. I have to give props to Erik Chan's Brian Dennis bag, which I took visual evidence at Worlds last year, and Cale McCoy's 4-stitch pokebag that I traded with a couple of months back for further elaboration on the pattern. It's really as simple as a pattern can get:

5 pents, 3 hexes - one color (red or white)*
7 pents, 5 hexes - one color (red or white)
12 hexes - black

Focus on sewing 5 black hexes around 1 white pentagon. Now, on the second pent, whether it is white or red, make sure that that pentagon and the 3 added hexagons are of a solid color*. Add pentagons along the way of that very same color and add black hexagons along the way, to form the bordering line. From there, it is easy trailing to finish the rest of the bag with the other color (it should look like a solid colored pentagon flower surrounded by 5 hexagons of that same color, with 5 pentagons bordering that very same pentagon flower).

I hope this helps any stitcher wanting to learn how to make a Pokebag. :) Surely, the best colors to use are Flash Red, Country Cream and Black Noir, but if you're like me, you can use Google Images to research on other Pokeball designs and put a little falir on your pokebag .
Waylon Lew - maker of Wasabi bags
NYFA represent.
"Footbag can be pretty frustrating when it's supposed to be fun. I was partly driven by this forum - practice, practice, practice... As that is true, I think someone can be too focused on progressing and training that they miss the fun aspect of it." - Bander87
JoshC.
Multidex Master
Posts: 219
Joined: 19 May 2008 11:58
Location: East Greenbush, NY

Post by JoshC. »

I have been really confused about gather. First of all, what exactly is it referring to when you say it. Also, what are the pros and cons of high and low gather. I know this has probably been asked, but I couldnt find it in the search, or on google. Hopefully you could link me to an explanation, or give me one of yours. Thanks :)
Josh Cummings

I'll rest when I'm dead.

If you do what you've always done, you'll get what you've always gotten.

Check out my shred blog: http://modified.in/footbag/viewtopic.ph ... 20&start=0
Check out my skate blog: http://cummingsspeedskating.blogspot.com/
User avatar
gMoney
Think Pink
Posts: 1210
Joined: 10 Sep 2006 14:17
Location: Chicagoland Suburbz

Post by gMoney »

This thread has motivated me to make some more bags. So thanks for that.

I've been thinking about switching from lead to steel. I'm not sure how many people use steel in their bags, but I sure would like to not get lead poisoning. Are there any big drawbacks for steel? Is 55 grams of steel that big of a difference from 55 grams of lead? And is steel bad for the material? Is there a complimentary filler that won't kill the panels?
Grant Mooney
Footblog
Challenge
Post Reply